|
Ridley Scott |

|
|
|
Ridley Scott |
|
|
In this page I will provide a step-by-step description of how I create storyboards. My way is probably not the way you were expecting to see, but nonetheless, I believe you will learn valuable lessons from viewing things from another perspective. Story-boarding is about rendering images and there are many ways to do so. I use a rendering method that suits me and serves my projects well. But notwithstanding the method or medium you use to render boards, the end result of story-boarding is always the same.
Regardless of the project you want to visualize -be it a film or a documentary, a television show, a theatrical production, an advertising campaign, or a play-by-play process (such as a sport's play sequence or the creation of a culinary dish), story-boarding will help you
However, in story-boarding, in contrast to the written word, understanding is achieved through pictures -though descriptive text and symbols are sometimes used to further elaborate on an idea. The pictures can be line drawings, symbols, painted images, or photographs. They may even be a combination of all of the above. But if bringing understanding is the primary goal of story-boarding, doing so in a fast and expedient manner has to be your second highly desirable goal.
Keep in mind that you will end up doing hundreds of individual panels, so the rendering method you chose to create your storyboards depends entirely on your own artistic skills. Okay? So let's get to it!

|
||
|
Bad Blood is a |
My intention to make a film led to story-boarding. I wrote a screenplay titled
When you have a burning desire to do something creative -like a movie, but with only the possibility of adquiring very limited resources, you have to dedicated an exhausting amount of time to figure out how to make every penny count. To show more on screen for less money meant preparing well in advance to successfully overcome the enormous challenges of film-making. So, how do you make a movie for less? Answer: By spending more time on thinking and planning. And, how do you think and plan for a movie? Answer: By making storyboards.
I was determined to make a movie. My first move was to analyze my situation. It immediately became clear that hiring an established production studio to shoot the film was out of the question; this simply not in our financial landscape. So instead, we used what we had within reach and planned ways to get what we lacked. Consequently, my colleagues and I decided to produce the film on our own.
|
|
||
|
Dreams Visual Communications Production Studio |
The studio’s organizational chart was kept simple. Nancy Lewis and Peggy Krysinski, two of Bad Blood's four co-producers, would be handling the day-to-day studio operations; John Ban, our third co-producer would be running the crew and dealing with technical challenges, and I would handle the creative aspect of the project. Taking the responsibility of all creative decisions encompassed being the film’s director, production designer, and director of photography. It was up to me to decide the look, the mood, the style, the pace and the feel of the entire movie. Since I was also the film's editor and the screenwriter, I had complete creative control in the fullest sense of the word.
From my experiences in the theater and the visual arts, I knew well that the success or failure of any collaborative undertaking depends greatly on good communication. Bad Blood's production team and its department heads (many of whom I had not even invited yet to join the project), with few notable exceptions, had never worked on feature films before. So it became imperative that everyone involved had a clear picture of what was being done and why things were being done in a particular way so that confusion, the misused of time and resources, and dejection on the set could be eliminate to the greatest extent.
In film-making, just to remind you, the process of communicating in pictures is called story-boarding. A director with good verbal communication skills is a plus on the set but I had long known that a picture is worth a thousand words. In this situation a thousand pictures were even better. From my point of view, storyboards are

|
||
|
Alfred Hitchcock |

|
||
|
Akira Kurosawa |

|
||
|
Ridley Scott |
Forty years of painting and designing placed me at an ideal spot to render a 'picture' version of the screenplay. Three movie directors that I greatly admire used their arts background to great effect in story-boarding their entire films. They are
To be sure, there are many other prominent directors, such as

|
||
|
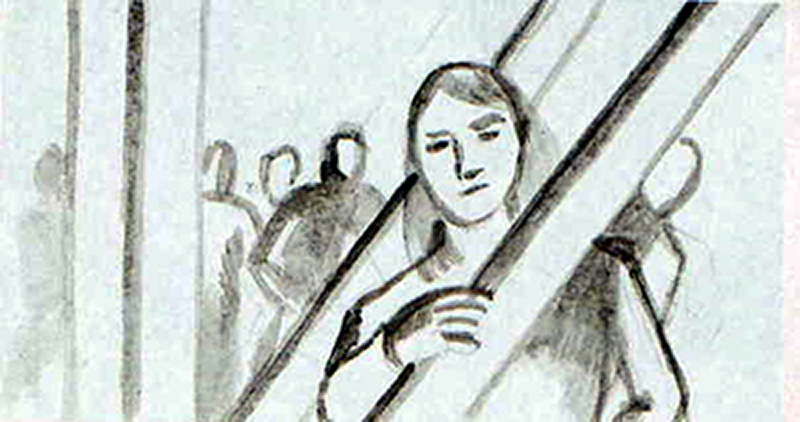
Hitchcock's sketch for |

|
||
|
Kurosawa's sketch for |

|
||
|
Scott's sketch for |
This is how you begin to learn the art:
I began creating Bad Blood's storyboards in the fall of 2003 and completed them in April of 2005.

|
||
|
Movie stills from Alfred Hitchcock's |
Let's say you are working on a thriller and have to do a scene of a beautiful woman being stab as she takes a shower. The screenplay reads: "The murderer silently approaches the women as she showers, violently pulls away the shower curtain, and stabs her to death." You want to film the gory scene showing the murderer approaching the shower stall, raised knife in hand ready to strike, then pulling away the curtain thus revealing the beautiful nude body of the woman, and then attacking his victim with multiple knife stabbings until she falls dead -every blood drop captured in glorious color! This is a key sequence in your film, a turning point, and it has to be absolutely memorable.

|
||
|
Movie stills from Alfred Hitchcock's |
But when you get together with your various department heads to discuss the actual shooting of the scene, you realise that it will take convincing the actress to, first appear nude in the scene, and then spend countless hours in makeup so that the makeup artist can apply a progression of knife wounds (in between shots). In addition, the prop master has to construct a body dummy to be used for the shots when the knife enters flesh, and then you will need other technicians to operate tubes that squirt gallons of fake blood on both the dummy and the actress! The result is a very time consuming, complicated and expensive scene but you feel its worth it.

|
||
|
Movie stills from Alfred Hitchcock's |
However, your budget person tells you there is no money for it, so, you have two options: you can raise more money or... you can go back to your drawing board and think hard of a way to do the scene cheaper and faster -but without loosing its visual impact! Your first instinct is to find other ways to fix the problem while still sticking to your original gory conception. But after more meetings and consultations with your staff you have to face up to reality: no extra days, no nudity, no dummy, no complicated special effects, no additional technicians, no actual stabbing, no knife touching flesh, and no gallons of fake blood. So what to do? I can't answer that for you, but I will advice you get a copy of the film
So, how did Hitchcock pull off one of the most terrifying masterpiece of a montage in the history of cinema without no extra days of filming (though he spend a week on this scene alone), no nudity, no dummy, no complicated special effects, no additional technicians, no actual stabbing, no knife touching flesh, and no gallons of fake blood? He did it by carefully thinking about the scene elements in advance and ultimately story-boarding the montage as edited in the final scene. Like Hitchcock, you too want to interpret your scenes within the context of the story in your own visual style. But to follow Hitchcock's example,
What follows is a description of my story-boarding method and routine. Please keep in mind that there is no standard way of preparing storyboards. Certain things remain constant but each production will determined its own story-boarding needs. My working style and procedure

|
||
|
A book from my personal library with very useful information about creating storyboards. |
Don't limit your reach by only watching

|
||
|
A book from my personal library with very useful information about drawing characters and scenes. |
Now, before I begin introducing Bad Blood's storyboards, I want to tell you right from the start:

|
||
|
A book from my personal library with very useful information about film making and trade terminology. |
My good friend

|
||
|
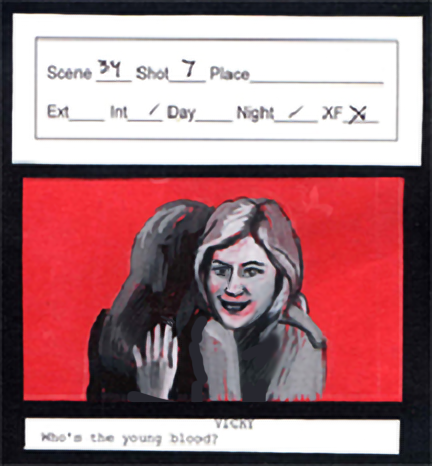
Storyboard for |
Story-boarding comes effortless to me. Even as a teen working in my own theatrical productions (for years I did Spanish theater) I sketched everything to help explain my ideas to others since the crews were made of volunteers. But now was the first time I had to do boards to be followed by a production crew that spoke in film-making language. So the first thing I did was learn the vocabulary of the trade (the kinds of shots, camera movements and so forth) and then find an effective way to say it all in visual sound-bites. Notice how plain and simple my storyboards were -even though I can accurately paint you a copy of the Mona Lisa! (see
These finished boards were then photocopied on legal paper (8-1/2 x 14 inches -or 216 x 356 mm), put in binders and passed along to the crew. On the right hand side of each sheet the shot-numbers were listed and then marked with a red marker as each shot was filmed. Since each panel was basically a amall thumbnail, the boards were relatively fast to create. Also, I was in intimate terms with the material because I was the author of the play being filmed. The drawings were minimal, sometimes stick figures, but they were effective and everyone understood clearly what they were supposed to do. Camera setups were fast and efficient and the actors commenced the blocking of scenes by just glancing at the pictures.

|
||
|
You can learn a lot from this guy. Get DVD or online copies of his films, |

|
||
|
Storyboard of the |
There is an important lesson to be learn from this (let me repeat):
Before you begin any meaningful journey, it's imperative that you know in advance what your destination is. At the beginning, you may not have mapped every road along the way, but you will always know the correct heading. With story-boarding, it's the same concept. This is not a casual trip of exploration to see what may come, because story-boarding is about answering specific questions and solving problems in advance,
I have observe many young aspiring film-makers so inebriated with the perception of their own talent, that they view storyboards only for their own exclusive and well-guarded use and benefit, thus forgetting the first fundamental truism of film-making, which is: film-making is a
Once you begin thinking in broader terms, place yourself in the shoes of every single person in your production-team, and note their roles and responsibilities. Then make an evaluation of how your story-boards will supply answers to their particular needs. When I started visualizing
Almost everyone planning to storyboard a screenplay for a film project could benefit from this evaluation. These are important considerations that should be seriously studied. As for me, I felt I had to think things three times as hard. Bad Blood's storyboards had to provide a lot of information and come up with a lot of answers, particularly since I knew then that I would be working with an inexperienced crew, and some of the shots and scenes were quite complex. So in preparation for the task ahead, I had made a list of the people I would need on my production team, took time to read and learn as much as I could about their duties and specific tasks, and tried to imagine me doing their work.
This gave me a whole new perspective and a greater level of respect for the work of everyone involved in a production. I was able to see how all the pieces of the puzzle fitted together to take a film from the script to the theater. I now had a clearer view of the destination and what it would take to get there. My storyboards would be key in mapping the road ahead. So I prepared well in advance and planned a working method to produce storyboards that could supply insights and answers to the entire production team.
I have to make a confession:

|
||
|
This is me sketching. |

|
||
|
Example of an effective storyboard using |
Here's a note of interest:

|
||
|
Pencil thumbnail sketches and notes by Ridley Scott on the screenplay for |

|
||
|
A panel from Kurosawa's |

|
||
|
Storyboards of Hitchcock's famous shower scene in |
Where do you begin?
So, immediately after reading the screenplay and jotting down the list of visual elements, you go and collect reference images of everything on that list. Search for them in books, in

|
||
|
An example page from my reference files. Sometimes I scanned and image from a book and printed them for my files, and at other times I simply cut images from magazines and pasted them on a blank sheets of paper. I made little use of |
You can organize your references in many ways, but here's what I do. First, I create
For example, this is how it worked for me: following my notes on each characters, I went searching through dozens of magazines cutting out images of any article of clothing I envisioned them wearing (dresses, pants, suits, hats, belts, shoes, purses, coats, jewellery, uniforms, and so on). Then in my morgue, under that characters name heading, I would paste all my clippings of images, written descriptions, and even samples of fabric. Also things that you considered obvious need to be researched, like photographs of police officers. Have you ever considered what is the proper uniform and equipment of a police officer in your area? Chances are that if I were to ask you to draw one right now, your memory would not be as good as you think. This is why you have to get visual references of everything!

|
||
|
Your one-stop resource center. Keep all your research material where you can store it and find it again easily. I discovered that storage cardboard boxes with removable tops worked best for me. |
Early on I had met with most of the talent that I wanted cast for the film and had made a picture portfolio (see
As your collection grows, so will the size of your files. My image morgue for Bad Blood's characters alone ended up being about 6 inches thick! At this point, your morgue files should contain all you will possibly need to begin working on your storyboards. But I took this a step further by scanning the material and transfering each page in my morgue into computer files. This made sense because many of my reference images had been downloaded from the web and were already saved in my computer. So storing my
Another advantage to storing files in your computer is that your image viewer allow zooming to better study specific details. What's more, you can create new visuals in
After gathering visual references, I went back to the script. When writing a screenplay I only identify the scenes, never the individual shots. At this stage I like to pass it along to test readers for criticism. Not marking the shots or camera movements makes the reading experience more enjoyable and less distracting, as if reading a novel. Later I reformatted the screenplay, color-coding the manuscript in preparation for the script breakdown.

|
||
|
A sample color-coded script taken from google images. |
Before we move on, let me give you some definitions you'll be glad to know. Films are made of shots, scenes and sequences.
During editing, a shot is sometimes cut into sections and montaged with other shots to form scenes. So what was first filmed as single shot during production, could end up as more than one shot in the film. When a film is shown to the public, what they see is the final version of

|
||
|
This is a good example of a color-coding template. Make sure you have a collection of color markers at hand and a copy of this template as reference. In time, you will memorize what each color and marking symbol means. |

|
||
|
This color-coding template example shows how colors are not always assigned to the same things (as compared to the previous image). Sometimes you do not have specific color markers or pencils at hand. Or perhaps you have your own color preferences. The important thing that you use the same pattern within your entire production. |
After making a list of shots, next I considered

|
||
|
This is an example of a storyboard template page. You draw on the panels and write a description at the bottom. The finished sheets can be copied and put together in a binder. |
Finally, I had to decide the size of my storyboards. Many artists do them the size of typewriter paper, that's 8-1/2 x 11 inches (216 x 356 mm). They make a few panels in each sheet of paper that can later be placed in some kind of binder. This method makes handling convenient because copies can be easily reproduced and passed around. Some storyboard artist simply print sheets of paper with a series of empty panels to work on. But I do not like to do it this way. I much prefer a larger format -something with weight on my hands. Keep in mind that my working style (developed from theater productions) was to gather everyone in a room and fix large size boards on a wall for everyone to see.

|
||
|
My story-boarding renderings have become more sophisticated, as shown on this example from my current 2020 theater pre-production work for |
So what I did was to draw the panels on separate sheets of inexpensive color paper (also called craft paper or construction paper), and then cut and paste them onto a larger board, as you will see later on. Once completed, the storyboards were photographed and recorded on CD. Nowadays, I produce a PDF file that I upload to
I have always kept things simple when I work. I make sure everything fitted inside a small box so that I could carry my kit anywhere. Back then, I did the most of the work in my basement, siting in front of a small writing table with a cork-board in front of me. My references were pinned on the cork board, and my kit was kept in a shoe box. A desk lamp and blank sheets of construction paper completed my setup. On rare days, I would go to the park with my kit under one arm and a bag of snacks on the other, sit on a picnic table, and work the time away.

|
||
|
My story-board drawing kit (2004). |

|
||
|
Articulated toys and figurines are excellent tools for posing, planning and composing your shots. |

|
||
|
|
My digital camera was the most important piece of equipment. I used it to photograph models from different angles to serve as reference for my panels. A digital camera with an LCD display was ideal. You can shoot tons of reference shots without spending money on film developing. Or you can print a reference thumbnail sheet after downloading the pictures to the computer. People with good drawing abilities might prefer drawing while viewing the models, thus eliminating the need for photographic reference. But viewing models through a camera lens feels more like viewing the actors through a film camera on the set.
Keep in mind that all you need is a pencil, a sheet of paper, and a small ruler to make your panels. These are the only items used by many professional storyboard artist. Use what works for you. You do not need a large place to work (you could but it's not necessary). I kept my supplies in a shoe box on top of a small table. In front of the table is a cork-board attached to the wall. I use the cork-board to pin up my references. I've see other artists simply taping references to the wall. I also had a lamp close by since I usually worked at night.
I don't listen to music while I work -it's distracting. Instead, I listen to the screenplay playing inside my head. I play the scene, I speak the lines, I get inside the world I'm creating until it flows into my storyboards. Every 20 or 30 minutes, I take a break to stretch out and rest my eyes. Then I get back at it, one drawing at a time, hour by hour, day by day -however long it takes, until you are done!
As I mentioned earlier, I paste my story panels (renderings) and diagrams to a board. I begin by gluing a

|
||
|
I printed a sheet of ID labels to cut and paste on the boards to identify each shot. |
After pasting an
Note that I created panels on different color papers to represent day, night, and interior, exterior and so on. For example: I use blue for night exterior shots, red for dark or mood interiors, black for shots in total darkness, white or green for interiors with strong lights, and yellow or pink for daytime exterior shots. Again, my color choices were entirely personal. I also liked the fact that this got rid of a blank white space in the renderings. I feel that a color background adds
|
||
|
Story-board brush-rendered panel from |

|
||
|
Study the images above. Which is more |
I'm a professional painter; I painted my panels. I know that lines do not exist in the real world -we do not look like line drawings! Instead we distinguish forms by the way natural or artificial light reflects on them. This is the way our minds work, this is how film makers visualize films, and this is how I see things. So to be able to

|
||
|
Sample board from |
Another thing I do differently than most artists is that I do not add arrows to indicate camera movements as many other artists do. I like my panels to look like stills from a movie. So instead of using directional arrows in certain shots, using a fine point marker I simply write down descriptions, instructions or relevant information about the shot and then paste the note to the boards below the panel. I also cut and paste dialogue lines when required. Sometime I take shortcuts to avoid rendering the same shot. If a similar shot is repeated, like for example, a close up of a character, instead of drawing the same panel again, I simply leave the blank space on the board empty and later fill it with a printed copy of the panel (by scanning and then printing the original panel or by making a Xerox copy). This is another example of my finished boards:

|
||
|
Different color panels represent differences in time and scene locations. All panels are rendered in black and white acrylic inks applied like watercolors. Detailing is kept to a minimum. Each board is finally sequentially numbered at the top left. |
After I complete a board, I number them at the left top corner with a white grease pencil or color pencil. In case you haven't notice it, I use a black board to paste the panels because it makes them pop out like a movie screen. The finished boards are sturdy, loaded with information, easy to see, and also attractive -since you know you have to dazzle potential investors! My final step was to photograph each board in high resolution and storing the data on CD. As a safety precaution I make two copies of the CD and store them at different locations. The original boards are stored in a specially constructed wooden case. Even if they are not intended to be art, they look damn artistic! Some day they could prove valuable.
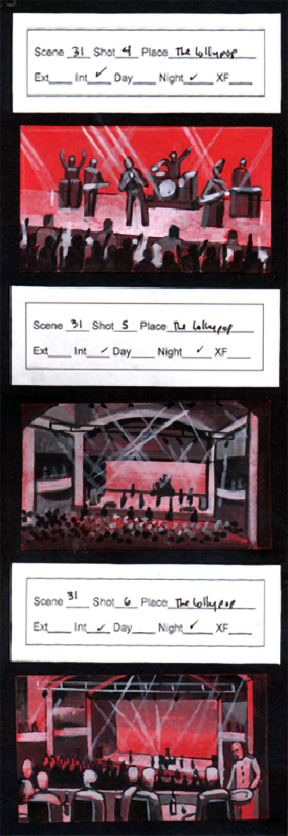
The next set of sample boards illustrate how some of the action-crowd sequences would play out (read this section of the screenplay by clicking

|
||
|
|
In several shots with complex camera tracking, I rendered more than one panel for each shot to better illustrate the action (notice the camera placement diagram on the board above center). I'm a firm believer in carefully compose shots and fluid editing to visually enhance the artistry and poetry of the story. Directors like

|
||
|
|
In my early days in Puerto Rico, I used to do big productions from the

|
||
|
A very crude and simple cardboard model was used for the Orsini assault sequence. |
Action scenes are perhaps the ones that benefit the most from the use of storyboards. While it helps to storyboard an entire movie, you don't have too. But it you must board some scenes, make them your action scenes. To visualize the action for

|
||
|
|

|
||
|
|
The next examples shows a panel illustrating a long shot of

|
||
|
Long shot rendering of |
These simple panel and diagram shows the construction supervisor, the lighting manager and the art director (or set dresser -if you can afford it) what they need to prepare and dress the set, and also gives the matte painter the required information needed to complete the shot in post-production. Notice how the false front porch is moved forward to allow the camera the needed space to film from that angle. While this illustration is not technically a storyboard panel like the one on the left, it is a handy diagram to have on your boards.

|
||
|
Diagram of false porch front. |
I use storyboards not only to visualize the film on paper, but also to explain how the visual illusion is created in some shots and scenes. Having prior knowledge of set pieces (I'm also a set designer) helps the storyboard artist understand the mechanics of a shot and the best way to illustrate it. To see how this set piece and the resulting panels features in the scene, see

|
||
|
Diagram showing the mechanics of the scene. |
The previous image shows a top-view diagram for camera placement and movement. A track illustrates the direction of the move, beggining with the 'black camera' position, and ending with the 'white camera'. The diagram also shows the initial position of the actors and arrows marking the direction of their movements in the scene. Additional information for the camera crew is added on the labels. Bad Blood was going to be filmed (old fashion) Hollywood style, using one camera and careful lighting of each shot. The film would be edited

|
||
|
Storyboard of the scene on the diagram being played out. Camera follows the biker from title sequence to The Macho Man club. |
Every shot was planed in advance and the photography followed the storyboard precisely. Since I wore all the creative hats, I could have a conference in my head and there would be very little second-guessing. Unless there was a good (creative or logistical) reason for changing the shot, or to add additional shots, the production would continue on a well thought-out schedule. However, you do not have to include production diagrams on your boards. I do so because is satisfies my own needs. On the other hand, thinking as a producer, if a potential investors asks how we plan to shoot a particular scene, I can easily explain how with these diagrams on my storyboards. This not only shows how prepared we are, but also that we know our business and thus his or her money is well invested.
These small ink drawings were done very fast. Using the white drawing pencil, I made a few guideline and stick figures and then finish of the panel with brush and ink. I use a white pencil because it shows well on the blue color paper which I selected to render night exteriors. On light color backgrounds I draw my sticks with a red pencil. Again, color here is a matter of personal preference. A note worth repeating: I do not use regular lead pencils because graphite smears easily and dirties the work.
I used a fine point marker to write descriptions on separate pieces of paper, which will end up glued to the board. Notice also that I am very specific about where the main source of light is placed and how the shot is choreographed. All this is noted in the diagram. These are the types of shots that forces you to think hard and plan ahead. As I storyboard a shot I'm thinking of how to make the best transition into the next shot and how they will strengthen the telling of the story. I feel that story-boarding is more than just showing how a character moves from point A to point B. It must also capture the manner of the movement and how this movement affects everything that is seen on the screen. In doing so, I transition from being an illustrator and transform into the filmmaker.

|
||
|
Study of an Sergei Eisenstein's sketch for |
I take inspiration from the Russian film pioneer

|
||
|
|
Even though the use of storyboards was not an established standard in his day, he was a great admirer of Disney animation. During a visit to the United States in 1930, he was welcomed by leading Hollywood luminaries, including

|
||
|
Movie still from Eisenstein's |
I can still vividly remember specific images burned into my subconscious by four movies I saw televised through
This was remarkable enough considering that this was 1969 and I was only 10 years old. Yet the truly remarkable thing was that then I could only speak Spanish, not Russian, or Japanese and much less Shakespearean English (a language more foreign to American ears than Klingon talk), but still I could follow the story and sit spellbound by the artistry of the imagery! That's the power of cinema in the hands of masters! And what did these masters have in common, aside from genius flowing through their veins? You guess it: they did extensive preparation and visual renderings before shooting began. These are the results that story-boarding can help you achieve. About genius flowing through your veins, well, that's entirely another matter for others to decide.
There can be one drawback to being well prepared.
A digital camera is an invaluable tool for helping you visualize a shot. Remember, you create your panels from the point of view of the audience! It is they who are looking through the camera. Your panels show what they see. So the camera

|
||
|
Articulated figurines stand in for actors. They are a great aid for studying shooting angles. |

|
||
|
|
For the most part, while story-boarding Bad Blood, my models were inexpensive wooden figurines about six inches tall. On rare occasions I was fortunate to have one of my friends to model for a pose. Unless you need facial expressions, I suggest you stick with the wooden dummies –they are less distracting!

|
||
|
Sometimes, friends can model for you. You can also light them to match the shot. |
|
||
|
A panel rendering aided by a reference photo from the live model. Always keep in mind that you are not doing portraiture, but a one-minute rendering that captures what you need to show in the shot. |
Figurines are great aides in planning multiple character shots, camera angles and movements. This is the same technique I use to plan movements of actors on the theater stage (referred to as

|
||
|
Figurines are great for setting up group shots. You can work the composition by moving the figures around, take several photographs to study the best camera view and the best lighting scheme. |

|
||
|
You can make storyboards by simply using photographs like this one. This eliminates the need for hand-renderings and saves you time. The drawback is that, while this would be a very effective way to choreograph action shots, it tends to miss the nuances you get from a rendered image. |

|
||
|
Having a camera with a macro lens is a must for close-up photography. It helps you compose shots through the lens and you would on your movie camera. |

|
||
|
Action figures are excellent for studying how lighting affects facial features. I use a desk lamp as the lighting source. |
I pay less than $10 for a car replica at a toy store. The wheels turn, its doors and hood open so when you get tired of drawing you can play with it! For scenes involving more than one vehicle a couple of matchbox cars will do the trick. It helps if your camera has a zoom lens and a macro feature for extreme close ups.

|
||
|
Scaled replicas help eliminate the guesswork when rendering vehicles and other mechanical equipment. |

|
||
|
Notice how the above photograph of the vehicle was used in this rendering. |

|
||
|
The model was also a great aid for composing this shot. |
Sometimes I draw a larger panel (still maintaining a proportional aspect ratio) when a complex sequence needs to be explored in detail, like in the following example. Well lighted and composed shots are not only attractive to look at but can also save a lot of time and money when used to convey stylized scenes of violence and action. This rendering was particularly important because it would be used to illustrate my intention to dolly back and forth and pan through the various parts of the mise-en-scène to focus on three different elements of the story in one shot.

|
||
|
Rendering of final shot at |
You have to be a student of films (on your own) to make films. I studied the films of
Finding the right location to fit your vision is not always easy, especially if it costs money to secure. For

|
||
|
I'm always prepared with a shot list before visiting locations. After getting all the shots on the list, shoot more pictures. They may give you another perspective on composing a scene. And, always take reference wide shots facing every wall because they help you map out the space. |
|
||
|
|
Studying a location in advance (whenever possible) is an excellent way to plan complex shots before the rush of production. It is also a good idea to visit the location and walk through the space to get a feeling of the actual scale. This shot sequence was designed to take place at an existing location dressed up to look like a more impressive (and expensive) set than what it really was. Having the experience and the references from an actual location really helps to visualize the feel of the scene.
Sometimes there is only one place to place the camera to get that million dollar shot. Working the logistics of the shot on your storyboard means that once you are filming on location you will get that shot. I have been on sets were the director has spent hours hunting for the shot, shooting at everything but never getting it. If only they had prepared in advance!
A great benefit about doing your own storyboards is that you are forced to think long and hard. Here's another example showing a shot sequence diagram on the left. In this scene, taking place inside a police station, the camera tracks officers Dusti and Olivero as they make their way to captain Mason who is in the process of packing his personal belongings into a box. The following panels illustrate the beginning and the end of this tracking shot. This is all it takes for everyone to understand a complex shot.

|
||
|
Tracking shot at the police station. |
As mentioned earlier, one of the advantages of working with black and white ink is the ability to visualize 3-D form instead of just 2-dimensional shapes (as in a line drawing) by adding light and shadows. Inks (or liquid acrylics) are very fluid and easy to work with. I use the same brush to do all my panels. I simply rinse and blot the excess water before switching from one color to another. I like to use construction paper because it absorbs ink well and because the paper's color immediately adds substance to the scene.

|
||
|
Security room sequence. |
As I paint I am not very concern with the color scheme but with tone and mood, with lights and darks. But don't misunderstand; color is also important to me. However, one of the few drawbacks of digital film-making (as of this 2005 writing) is the loss of the rich color captured by film (we intend to film in HD video). So instead thinking about color, I concentrate on value and compose my scenes in an artistic way that takes advantage of the contrasts between lights and shadows. (Note: as of this 2020 update, digital cameras have basically caught up to film cameras, so color is no longer an issue).
When creating your panels, work at achieving good composition by the correct placement of your visual elements (characters, props, and so on). One advantage of doing your drawing on a separate piece of paper is that you can crop the image. So, if you are not too confident of your compositional skills, just move the template over your rendering until what is inside the frame
Some panels in the storyboards look more elaborate than others but in reality there is not much difference. I follow the script in chronological order and this helps maintain a sense of visual continuity. On average it takes between 10 to 20 minutes to produce each panel after I have studied the particular section of screenplay I'm about to work on. Some panels need to be more detailed and can take as long as one hour, but many too take about a minute. At times I simply photocopy a panel and paste the copy where the same shot is repeated.
On my boards, one page of the screenplay is roughly about one full storyboard (about 12 panels). So for an average 120-page screenplay you will need about 120 boards (again, if done in my style). That adds to about 1440 panels. This means that to complete story-boarding the entire screenplay can take between 240 to 480 hours of work, or, another way to look at it, 6 to 12 weeks of full-time work. Longer or more visually complex screenplays like
As you can see, story-boarding an entire screenplay is a lot of work. But keep in mind that I am not just doing a visualization of the movie. At the same time I am also designing my lighting, placing and moving the camera; I am deciding what kind of lens to use on a particular shot, what sequence of shots to make the scene more effective; I'm finding ways to maintain quality while keeping costs down, or better yet, lowering cost. I am creating sets, wardrobe, adding music, thinking of sound effects, visualizing the individual performances and finding ways to make stunts safe. In the end, it took over 2000 renderings to complete my storyboards.
Doing storyboards in this fashion is labor intensive. It is a test of both your knowledge and your artistic skill. But I enjoy it. Everything I have learned or experienced in art, life and work comes into play. Nothing is wasted. It is also a great way to keep your mind occupied while waiting for funding to fall into place. At length, I am keeping track of the overall quality and consistency of the film. This attention to detail will greatly benefit the whole project, the talent, the production crew, the management, the producers and ultimately, the investors. And as an extra bonus, if you have done your work well, the audience will take notice.
If you do your own boards, it will cost you time and coffee. Lots of coffee. But since a great deal of movie-making is waiting for things to happen, you probably have more time than needed. If you can draw, you have an advantage. But, as I have already explained, you have other options for making your storyboards that do not require drawing or painting skills. For the cost of some props and a camera (which now everyone has on their phone), you can do it. But if you would rather hire a storyboard artist to do your boards, then you will need money -unless you are exchanging services, or the rent. On the other hand, you may have the artistic skills and would like to sell your services to others, but you need to know how much to charge. In either case, we need to know all there is to know about the money cost. So here's the information I gathered on the subject for a 2009 update to this page.
The few times I have been involved in similar situations as an artist, I got paid by the hour ($1,200-$1,500 for a 40 hour week), but other artists get paid by the panel. Bottom line, you negotiate your fee. But remember, professional artists do not do charity work
There is an area of film-making where low budget movies have not ventured much. Take a look at this shot below. In

|
||
|
Conceptual rendering for |
On the other hand, using one of the oldest techniques in movie-making, the matte shot, it is possible to this shot by simply building a wall and a staircase, and placing your extras on that waiting line (as illustrated on the diagram at the bottom right of the image). Oh yes, you will need a few vehicles, but no limos. The club patrons inside the balcony arches will be filmed separate and added later in the composite shot. The way this shot is designed incorporates live action into a matte painting (of the buildings and city background), thus creating a believable matte shot. By the way, the limos will also be painted in.
All that is needed to create a large or complex scene is a little know-how and ingenuity to give a cash-poor production a million dollar shot. And of course, you need a painter who can do the matte and a skilled compositor to put it all together. The computer will do the rest. These are the types of shots that need to be designed and arranged well in advance. This is also the place where you can not cut corners when it comes to hiring skilled personnel. In
To storyboard these sequences, it is ideal to have conceptual renderings that give you a clear idea of what the scene setting is going to look like. Some producers and directors have a clear vision of what they want... in their heads. This does not help the storyboard artist at all. So the Production Designer (if there is one) or the Director or the Producer needs to sit down with an artist/illustrator and visualize their vision on paper. Conceptual renderings are that important.
The last thing you do with your completed storyboard panels is perhaps the most important task: preserving them. I accomplish this in two ways: first by making a photo-record of each board and burning the data into a compact disc (this was 2005), and secondly, by keeping the original boards in a sealed box.
To do the first, set up an easel or support for your boards against a wall and then set a fixed camera in front of it. Shoot in daylight or light well. Then photograph each panel in high resolution. Then transfer the data into your computer, save into a file (which will be huge so make sure you have enough space in your hard-drive), and burn the data into disc. Make several copies and keep one as your
To preserve my original boards, I made a wooden box with a hinged top to keep them safe and secure. The most important thing was to store the box in a dry place and prevent them from being exposed to sunlight, or they would bleach and fade away in time. Keep in mind that the more boards I made the heavier the box got. So I made the carrying case sturdy enough to carry around.
Don't forget to properly identify your box or case with your name and contact information. You will carry your original boards to show them around on occasion and, just in case they get lost, you want to make sure they can find their way back. This is a real possibility if you travel by plane and have to check your belongings. So don't take unnecessary chances but do take every precaution!
I hope the content of this page was informative and proves useful. I leave you with a storyboard sequence from

|

|

|

|