'It's up to us' mural Keisha González Managing Director of the Metro West Community Development Organization |

|
|
'It's up to us' mural Keisha González Managing Director of the Metro West Community Development Organization |
|
|
If you have not already done so, I strongly urge you to see the
 |
The reasons that lead to vandalism vary. Some acts of vandalism occur as a prank. Because the destruction or damage might be slight, some excuse the actions by observing that the damage does not reach the level of a crime, giving the perpetrators a feeling of immunity from punishment. Another reason for vandalism is that the defacement or destruction of property allows a person to vent anger, frustration or anxiety without personal confrontation.
Vandalism tends to be mainly committed by juveniles. They use vandalism to vent their frustrations against a threatening object, a situation or an individual, but they vent their anger on something safer -like a wall or a window pane. This perception of relative safety by the perpetrator accounts for the proliferation of vandalism to the an estimated two-billion dollar yearly tag in property damages to households alone. But while many vandalize out of anger,
Graffiti is one of the most singled out representation of a subculture that rebels against authority, or anything that is perceived as "the mainstream". It can be a tool to express political attitudes, or a wide array of social/economic grievances. In our present culture, spray paint and markers have become the tools for graffiti. There are many styles of graffiti, from the very crude to the types that have developed into an art form. A huge branch of the "graffiti expression" phenomenon has been heavily influence by
For the most part, graffiti artists do not do their work for money, but for fame. In any group, there are individuals that can elevate any form of expression into an art. Some turn crude language into a poetic play on words that show great erudition. Others can turn spray paint into beautiful and expressive visual compositions. Thus, the "graffiti artist" was born and the streets became their galleries. Many have gained particular distinction as their styles became recognizable, resulting in devoted followers and admirers. Some have turned their skill into a lucrative business, and, as a result, they have leaned into mainstream.
This acceptance of graffiti as a new art form does not directly address the fact that graffiti committed without permission of another person's property is still vandalism. Period. Those who celebrate graffiti would call authorities in an instant if they woke up to discover that their homes were tagged or had become the canvas for graffiti. Even museums and institutions who pour acclaim and acceptance of graffiti as an art would not allow their premises to be defaced with graffiti for an instance. So the most obvious characteristic that all types of graffiti share is, that without the expressed permission by property owners to do so, it is still a crime.
Signing your name or other representation of yourself on any public venue, such as walls, alleyways, bust-stops, mail boxes, billboards, vehicles, and so on, is called
Taggers can be members of urban gangs marking their territory, or youth looking for notoriety among their peers. But across the nation, taggers are generally members of small loosely knit groups of adolescents, many from middle and upper income families, whose primary source of entertainment and excitement is the vandalism of private property with
Taggers are selective about the buildings they hit. Older, decrepit buildings are usually prime targets. But others target high-visibility targets in their quest for notoriety and fame. In the world of street art, muralists, graffiti artists, and taggers have an unspoken rule of respect. Tagging a mural or a beautiful work of graffiti art crosses that line. Usually
Street justice can be defined a punishment or
 |
||
|
|
 |
||
|
“They were furious. I’ve never seen pitchforks go up that quickly.” said |
 |
||
|
No sooner the vandalism was discovered, I started to get calls from friends sharing the news and the images (at the time I was working a job in Kent, Ohio). I recalled not having any particular feelings about it at the time, except for thinking: |
|
The day after the vandalism, |
 |
||
|
The story had spread rapidly through social media and many shared in "the devastation" the artist must be going through. But what I thought was, |
 |
||
|
|
 |
||
|
But the public made up their mind to restore the mural and I could not refuse. To do so would have been a betrayal of the community. Up to that point, I was aware that the mural had many fans. But I was unprepared for the avalanche of sentiment the art work had generated in so many people. Those who recognized me on the street or in places like the supermarket, approached me to vent their frustration and their anger, many sharing what the mural meant to them, and others -in graphic detail, what they wanted to do to the vandals. |
 |
||
|
A few days later, someone enraged with the vandals for tagging the wall, spray painted his displeasure with black paint over the former's graffiti tag! You just can't make this up. The one thing I knew with certainty, was that the vandals would be found out. Taggers are braggers, and this was too big to keep quite. Eventually, they were found out. I was told that the names of the culprits would not be divulged for fear of reprisals, and that perhaps they could do some form of restitution. I didn't press anyone for details and the last thing I wanted was to see these individuals in public. What was not known, was that I had already been told by someone else who the vandals were, and then asked (in as serious a manner as a heart attack) -what did I wanted them to do with them. I told them: |
 |
||
|
The day after the news reports, November 17, I was contacted by |
 |
||
|
A banner announcing the upcoming restoration was displayed on the wall. It was going to happen the Summer of 2018. I tend to fill my work schedule a year in advance. It so happened that 2018 was going to be one of my busiest years in a decade (see entries for 2018 on the 'artwork by year' page on the links menu). All I could afford on this project was one month, which turned out to be the month of June. So I began planning all the details months in advance. |
 |
||
|
Other organizations and private individuals contributed to the restoration. One of them was the |
 |
||
|
Since a major restoration was planned, we decided to take care of other issues with the wall. During the three years since the completion of the mural, the building had changed hands. Dr. Rinaldi, who owned the property and gave his approval to have the mural painted on the street wall, had sold the property and retired -to Florida. The new owners were also in the medical field, and continued the dental practice housed inside. Dr. Blank's eye care studio was still located at the end of the building (building-1 in the mural). But at some point during these intervening years, a car struck the corner of his entrance. So, it had been reconstructed with stucco blocks. It was obvious that the new owners didn't consider the mural's importance at the time. This area would have to be reconstructed to match brick on the wall before we could restore this section. |
 |
||
|
Another problem that needed to be addressed was color deterioration in sections were red paint had been used. Red in all its variations is made using pigments from various sources, such as those obtained from certain clay earth pigments, ferric oxides extracted during the precessing of iron, tin, or copper, or from mineral sources such as Cinnabar. The one thing that all red pigments have in common is that reds fade faster than other color pigments, especially those with a higher concentration of cadmium pigments. The reason for this, without getting into details, has to do with their chemistry and the way it reacts to sunlight wavelengths. But some brands of red paint are better than others because of the amount and kind of red pigments, and the type of paint vehicle (the liquid part) used in their manufacturing formulas. The reds in the mural, such as the red sections in the flag, had deteriorated badly and needed to be restored using a more stable red. |
 |
||
|
Another area that needed attention was the concrete sealer between the wall and the sidewalk. Vibrations and shifting ground had cracked the thin shell, and, as water sipped into the cracks and expanded with temperature changes, the shell broke into pieces. With the sealer in disrepair, weeds would grown again in between the cracks and the wall would suffer greater damage. A new concrete seal would need to be applied using a binder that would make the dry shell less brittle. |
 |
||
|
The current tenant had a problem with people trying to enter the premises through the second recessed door, instead of the front entrance on west 25th street. So they screwed a sign on the door. This was a crude solution to the problem, which defaced the integrity of the mural, regardless of the reason for placing it there. So another solution would need to be found to accomodate for the new signage. |
 |
||
|
A new pod was ordered for us to operate from. It was placed on the side alley next to the building. Pods -short for "portable storage containers", offer a very convenient and effective solution for storage space in just about any kind of setting. They come in various sizes and can be rented for any period of time. Their large roll-up garage door make them easy to load and unload, or vent in fresh air. |
 |
||
|
I store the data from every job in my computer and all my work journals in my office. The journals contain daily hand-written entries of just about everything that relates to a job being done. The journal from the original painting provided very useful information for the restoration. A copy of the painting palette was reprinted and taped to the side of the pod for reference. It was also used to make a new paint request from Sherwin Williams, ordering the same exact colors. |
 |
||
|
My brother Ricky helped deliver equipment from our shop to the pod. This time around, I would be using my own equipment for the job. |
 |
||
|
Scaffold sections were stored in place making sure we had easy access to them. At the shop we have enough sections for a four-level tubular scaffold (for about a 20-feet elevation height), four aluminum platforms, wheel jacks, and an assortment of safety bars. Our inventory also includes two smaller multi-purpose scaffolds on casters (5'8" maximum platform height), a mini-scaffold/mobile work stand (4' maximum platform height), and an assortment of ladders and expandable platforms. You can not be a muralist without access to this type of equipment. On rare occasions, we have used a rented scissor lift. |
 |
||
|
A work table was placed at the opposite side. Paint cans would be place on top, organized by color after being marked. We are strict about opening paint cans with a can opener, since they do not damage the drum/lid seal, and a dead blow hammer to secure the lids back on. This kind of hammer eliminates rebound and prevents marring to the can. Plastic paint can pour spouts are always attached to the edge of the can to prevent paint from filling the seal well and for ease of cleanup. We have cans of perfectly preserve paint years-old because the care taken in preserving the seal integrity. We usually buy metal paint cans of various sizes to store our own mixes at the shop. |
 |
||
|
We keep concrete powder in a bucket with lid and water for mixing in another bucket. |
 |
||
|
For cleaning brushes we use a three-bucket system. Each is filled with water. Brushes are first rinsed and scrubbed in the first bucket, then rinsed clean in the second bucket, and lastly rinsed again in the third bucket. When the water on the first bucket becomes dirty, the bucket is emptied, rinse clean, filled again with clear water, and then rotated to the end of the line. In a day, we usually rotate the buckets once or twice. Brushes are one of the largest expense on a mural job, so we take good care of them. |
 |
||
|
My crew for the restoration consisted of two hired experienced muralists, and half a dozen experienced volunteers. My first-day crew included |
 |
||
|
|
 |
||
|
Our concrete batch consisted of mortar mix (masonry cement and graded sand) mixed up with acrylic mortar admix -a liquid polymer the color of milk designed to improve performance, water resistant, shock absorption and bonding strength. |
 |
||
|
Amanda's first task was to mark every can of paint on the lid and created a color chart. You accomplish this by opening each can, dipping your finger in the paint and then dabbing a color spot on the paint can lid and on the color chart. These are numbered accordingly with a permanent marker. This practice saves a lot of time when searching for a specific color. In practice, you find the color you need on the chart, note its ID number, and then find the corresponding can. Keep in mind that on a large job using many colors and many more similar mixes, you can waste a lot just searching for the right can especially when several colors look the same. |
|
||
|
Before the beginning of the painting phase, masons were hired to reconstruct the recessed entrance wall using matching bricks. This meant tearing the stucco block wall down and then building a new one. |
 |
||
|
With the new wall completed, I proceeded to measure and mark the areas for concrete rendering to smooth out the grout lines between the bricks. |
 |
||
|
After the sections with concrete rendering had dried, several coatings of primer were applied to seal the brick surface and make it less absorbent. |
 |
||
|
The brick repair had extended into the figures in the front panel and the lower bulkhead. These areas were carefully cleaned and primed to preserved as much of the original painting as possible. |
 |
||
|
The priming on the sidewall and concrete rendered area were completed, and a new section was treated with concrete in the front corner. |
 |
||
|
After priming, we began applying base colors to reconstruct the image. |
 |
||
|
printed reference images were taped to the wall for easy reference. |
 |
||
|
Matching base colors were applied and the "sale" sign was painted using another brand of red color paint. |
 |
||
|
The same identical colors were used to match the original work. However, after three years of exposure, the paint on the wall had slightly faded. So we made minor adjustments to the paint. In the finishing stage, the match would be perfect. |
 |
||
|
A month before, I worked with |
 |
||
|
Their is no magic to removing graffiti. Every surface is different so the results vary greatly. Removing graffiti from glass or a smooth surface of an uniform color is perhaps the most successful. But removing graffiti from a textured surface, especially one with a multi-color background, is never a complete win. The process for this operation consisted in spaying a small section of the wall with the solvent solution, allowing the solution so soften the layer of paint for a few minutes, scrubbing the paint off with a brush, and then rinsing with clear water before the solution ate away the original paint. Timing was everything because if the solution stayed longer than it should, it would completely take away all the paint layers from the wall. |
 |
||
|
Work began on a less visible area to test the solution one more time. We had applied three coats of protective clear to the finished mural and I was hoping that the graffiti had not penetrated pass this barrier. Unfortunately, the vandals used an oil-base silver paint that contained a xylene solvent. Xylene is a colorless mixture of chemically-related hydrocarbons that often finds use as a solvent for paints and printing inks. It is a slightly greasy, colorless liquid that stinks to high heaven. It is also highly flammable and toxic to the central nervous system. Since it evaporated rapidly, the smell of the fumes will hit you fast even in small quantities. As a paint solvent, Xylene not only thins the paint for spraying, but once on the surface it helps provide excellent adhesion. In fact, in some areas, it helped the paint penetrate deep into the mural surface as the solvent softened and fused into the existing finish. |
 |
||
|
A great deal of water was used to rinse the solution away after an area had been worked on. The silver paint had penetrated into the pin size holes and crevices of the brick. I knew it would be impossible to remove. What's more, paint overspray had extended the damage even further. If it had been a simple one-color wall, then all you had to do was to roll a fresh coat of paint over the damaged area after the graffiti had been removed. But on a mural painting, this was impossible. The only way to "correct" the damage, was to paint everything again from scratch. |
 |
||
|
Scrubbing graffiti away is an expensive process. Restoring a damaged mural is ten times more expensive. They both require a lot of patient work. After an area of the wall was scrubbed and rinsed, a second or a third application of solvent would follow until most of the damaging paint buildup was removed. But in taking away the graffiti, you also took away part of the mural's thin color layers. |
 |
||
|
The work continued throughout the day for ten hours. The finished surface felt soft and gummy. It would take another day for it to harden again. |
 |
||
|
The following day we got a good view of the mural after the graffiti was removed. The top color layers, like the tints on the child's face, were mostly gone. Other areas had to be scrubbed right to the gray primer layer thus giving the wall a hazy look. Up close, you could still see silver paint in what seem an infinity of pinholes. |
 |
||
|
From my perspective, the worse of the damage was on the domino game scene. It was going to take a great deal of time to paint it again. The one saving graces was that, after removing the graffiti, I could see the images clearly. This meant I would not have to create new cartoons to recreate the drawings. From this point on, it was all straight painting. |
 |
||
|
With the graffiti removed, it was time to patch the crevice between the wall and the side walk. Loose sections were removed, the area was cleaned again, and a new batch of concrete mix was prepared. |
 |
||
|
Josh and Brittany did all the work from one end of the wall to the other end. They also patched other damaged areas and the holes left behind from the screws securing the "Reclaiming our Mural" banner. |
 |
||
|
Brittany Rodriguez, Josh's fiancee and another Muralmaster artist, was on her college break so she also volunteered her time to give us a welcomed hand. |
 |
||
|
The concrete mix is applied in a slight upward angle toward the wall to keep rain water away from the corner. After it was smoothed down with a wooden float, a brush was used to simulate the texture lines of the sidewalk. |
 |
||
|
The concrete shell was allowed to cure for several days. |
 |
||
|
After the concrete cured, it was prepped with several coatings of gray primer. |
 |
||
|
Lastly, the primed surfaced was painted with several coatings of base paint. After a few days in the sun and street dust, the painted area blended well into the sidewalk to the point of being hardly noticeable. |
 |
||
|
Several holes on the wall were also patched. In fact, discovered a series of holes along the wall as if someone had taken a pick to it. |
 |
||
|
Once more, the scaffold tower was erected. Amanda and Janice were two very fit ladies who didn't mind at all doing all the physical work. Janice, in fact, ran marathons. I think I was the weakest person in the team. |
 |
||
|
Same as before, we took care to follow safety procedures, which included, leveling the scaffold everytime it was moved to another location along the wall. |
 |
||
|
Amanda is getting ready to apply base colors to the lower section of the wall, in what looks like a pose from one of the Sybils in Michelangelo's Sistine Chapel ceiling frescoes. |
 |
||
|
In the days that followed, Janice repainted the bulkhead panels on building one. |
 |
||
|
This was my painting setup: a small portable table, a tray with my paint mixes, a small pail with cleaning water, ear mufflers and a paint rag. Our small banner was attached to the side of the table. |
 |
||
|
While Janice and Amanda worked on the application of base colors, I concentrated on repainting the domino game group. People not familiar with painting think that you mix colors on a pallete and then paint one damage spot at a time. But in fact, there is not spot-painting. You have to repaint everything from scratch over it. |
 |
||
|
You begin by applying a base color and then blending lights and dark tones to recreate the form. |
 |
||
|
While I worked on the figures, the barbershop door and surrounding background was repainted in flat tones. |
 |
||
|
The paint on the door was thinned down in certain areas so the features of the door could still be seen. |
 |
||
|
The door was then modeled with light and dark tones making sure that we could still see the door features underneath. The base color on the wheel was then applied. |
 |
||
|
With the door and background colors completed, I continued painting the overlapping figures. At all times I had reference images to make sure the new painting matched the old one. Also, just in case we covered too much of the door's features, we had a reference image taped to the wall. |
 |
||
|
Basketball superstar Lebron James had just left Cleveland for L.A. I have great admiration and respect for all he did for Cleveland, so the least I could do to show my gratitude was to give him a free hair cut. So I painted him on the mural getting his free cut. |
 |
||
|
I could not spend a lot of time on Lebron, but I managed to get him painted in one afternoon. |
 |
||
|
This is the finished portrait. I was pleased that everyone on the street did a double take and a smile as soon as they saw him. |
 |
||
|
This image shows the silver paint stuck inside every pinhole and scratch on the wall's surface. This is why entire areas had to be repainted. |
 |
||
|
I spend many hours on my kneeling pad. This time around I'm blocking the street noise listening to Ennio Morricone's greatest hits. |
 |
||
|
It took me over a week to repaint the domino game scene -but Lebron looked happy! The barbershop door and surrounding background was also completed. |
 |
||
|
Janice took care of repainting all the red sections that had faded away. The first step was to sand away the remaining residue. |
 |
||
|
The surface in fact feels very rough. The fading process has a lot to do with temperature as ultraviolet rays burn away the paint pigments. Once the area is sanded smooth, it is cleaned with a mild detergent, rinsed well with fresh water, and then painted with a coating of red underpaint. |
 |
||
|
The red on the torn poster behind the runaway girl was also repainted. Later on, these areas will be modeled with light and shadow tones. |
 |
||
|
The red on the "open" sign was repainted as well. |
 |
||
|
I was never satisfied with the original version of the faded flag seen through the glass door. It had been painted under freezing conditions in great haste. So I took this opportunity to repaint the flag as I had originally envisioned it to be, and at the same time, incorporate the new signage into the mural. |
 |
||
|
The glass area was sanded, cleaned and primed white. Some rusted spots were also treated. |
 |
||
|
The flag was redrawn on the door. I had managed to save the original cartoon for the flag on the door. |
 |
||
|
It is extremely difficult for two painters to paint in the same style. So when I'm working with other artists on some of my projects, I give them the limited color palette they will use. In fact, I make sure I mix the colors to assure occuracy. Because as long the artist remain within the given colors, the finished painting will end up being pretty similar regardless of who did the painting. These is the color pallete used to repaint the flag. Notice how every color used on the modeling of the flag is on the color pallete above. Even though they seem different on the finished painting, they are actually identical. It's all an optical illusion when placing certain colors side by side. |
 |
||
|
Janice not only did a superb job painting the flag, she also did the tedious job of doing the lettering "on the glass". Notice the cast shadows of the letters on the flag. To accomplish this visual trick, I prepared a pattern for the lettering. The pattern was placed on the door and traced. Then the pattern was moved to where the shadows of the letters would fall depending on the angle of the sun, and the pattern was retraced again. The cast shadows were then painted on the flag, making sure to change color tones between the red, the white and the blue background colors. Lastly, the white lettering was done. |
 |
||
|
I could not have been happier with the new flag representing the fading American Dream. Now compare the new lettering to the sign that have been previously screwed over the door. The difference was like night and day. |
 |
||
|
These mailboxes need to be retouched and the above area prepped for a new sign. |
 |
||
|
Image of the completed mailboxes and signage. |
 |
||
|
An elderly lady had contacted me to ask how much I would charge to add the names of some families that had once lived in the neighborhood. They represented Slovenian and Polish groups that were a part of the neighborhood's history, so I added their names to the mailboxes as a courtesy, no charge at all. |
 |
||
|
Once more, Amanda did the thankless job of tracing the new sign for Dr. Blank's office. |
 |
||
|
Then she did the lettering and touch up any sections that needed touch ups. |
 |
||
|
After the lettering was done, I proceeded to paint the top graphic. |
 |
||
|
This time around, instead of doing a monochrome image like I did the first time, I decided to add a little color to it. It was an improvement. |
 |
||
|
Amanda loved working outdoors on top of a scaffold. I really had lost the taste for it, so having young energetic people like her on my crew, greatly encouraged me to continue on. |
 |
||
|
Before repainting the upper sections of building 3 and 4, the walls were cleaned. |
 |
||
|
There is an increadible amount of street dust on these walls, and the last thing you want to do is paint on dirty walls. |
 |
||
|
After cleaning the wall's surface, base colors were re-applied to buildings 3 and 4. Note that there are six building painted on the mural, and we identified them by number from 1 to 6. Notice the horizontal safety bars at the top level of the scaffold. Sometimes when you paint, you get so engrossed in what you are doing, that you tend to forget you are standing twelve feet above concrete sidewalks. So having extra precautions for your safety is always a welcomed convenience. |
 |
||
|
A base color was applied to the building and continued on the lower level. Later on, shadow tones would be blended in and the windows repainted. |
 |
||
|
After applying base colors to building 3 and 4, we worked on the wooden beam. Next, we repainted the hands. |
 |
||
|
Once again, we had to deal with a lot of sun glare. Working these large scale sections meant going up and down the scaffold a lot of times to walk across the street to see what we were painting. |
 |
||
|
After finishing the domino scene, I started working on the child's face when Amanda moved the scaffold to work on the top portion of the wooden beam. |
 |
||
|
I applied underpaint to the child's shirt and began modeling his face in gray tones. This time around, I wanted to do something I had though of doing originally, which was, to make the child's face androgynous -gender neutral. To some, it would be the face of a beautiful girl, to others, that of a beautiful boy. To me, this was the face of new hope for the future, and hope, in my view, has not gender. |
 |
||
|
During the next stage, I modeled the child's face through more layers of tonal blending. Once I was satisfied with the facial features, I continued modeling of the shirt so that Amanda and Janice could repaint damaged areas on the moon section. Once completed, they began applying a coating of clear finish to that section of the wall. In time, a fresh coating of clear finish would be applied to the entire mural. |
 |
||
|
By the third week of June, 2018, the arms lifting the wooden beam had been repainted, as well as the finishing details on buildings 3 and 4. Amanda and Janice continued cleaning and applying the clear finish to the rest of the mural. |
 |
||
|
The "I promise to" poster from the 70s was also finished. |
 |
||
|
A total of three coats of clear varnish finish were applied to the lower section of the mural. The varnish was applied using 4-inch brushes, making sure that every square inch of the wall was properly treated. |
 |
||
|
During our fourth and final week, I concentrated on applying thin glazes of color on the child's face. I also framed the face in loose strands of hair. I was most pleased with the result since I believe I had achieved my goal. This image was the central focus of the mural and a key factor in the interpretation of the narrative. The upward gaze, the hand reaching for the moon, and the flowering beam are all interconnected. Again, read the page about the mural's creation so that you can understand all its meanings. |
 |
||
|
I colored the child's eyes green because the color green is the color that represents hope. It is a strong visual cue that reinforces what he is gazing at; this is the look of young, pure, innocent hope. It is a firm, steady gaze without fear and without bias. It is the look of the child that sees the emperor without clothes. |
 |
||
|
With the restoration almost completed, we added lettering on the sidewalk along the side of the wall. As we were doing so, a FedEx trailer made a turn, and it reminded me about the time I was painting near that corner in 2013, and a similar trailer when over the base of the street pole standing at that corner (the one right above my head), and almost killed me. 12-inches was all that stood between me and certain death. This was one of the many reasons I never wanted to come back. |
 |
||
|
The lettering read: |
 |
||
|
The sidewalk color was blended into the mural like the first time, to create the three-dimensional effect when seen from the street. |
 |
||
|
Notice how the figures seem to be standing on the sidewalk. Notice also how the concrete shell applied to the joint between the wall and the sidewalk appears to have dissapeared. Paint is an amazing thing. |
 |
||
|
Another coating of clear was applied over the newly painted section after the previous coatings had time to cure. |
 |
||
|
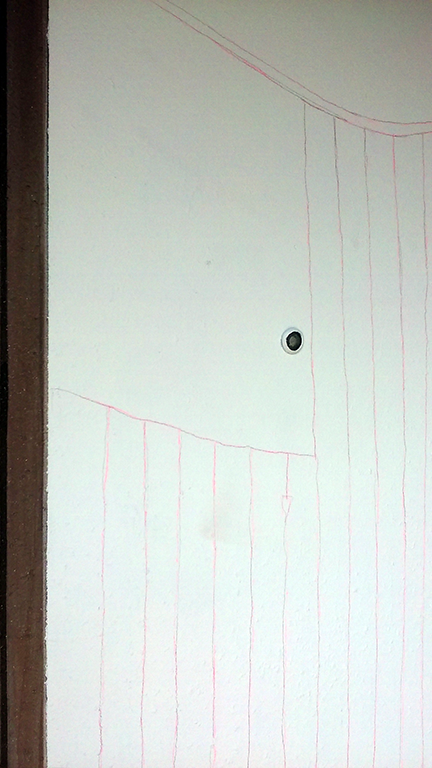
This is what the wall looks like up-close. |
 |
||
|
From the sidewalk, the coloring and transparency of the painted arms raising the beam, looks radiant under the midday sunlight. |
|
||
|
Another beautiful sidewalk view of the child's face. |
 |
||
|
View of the restored building-1. |
 |
||
|
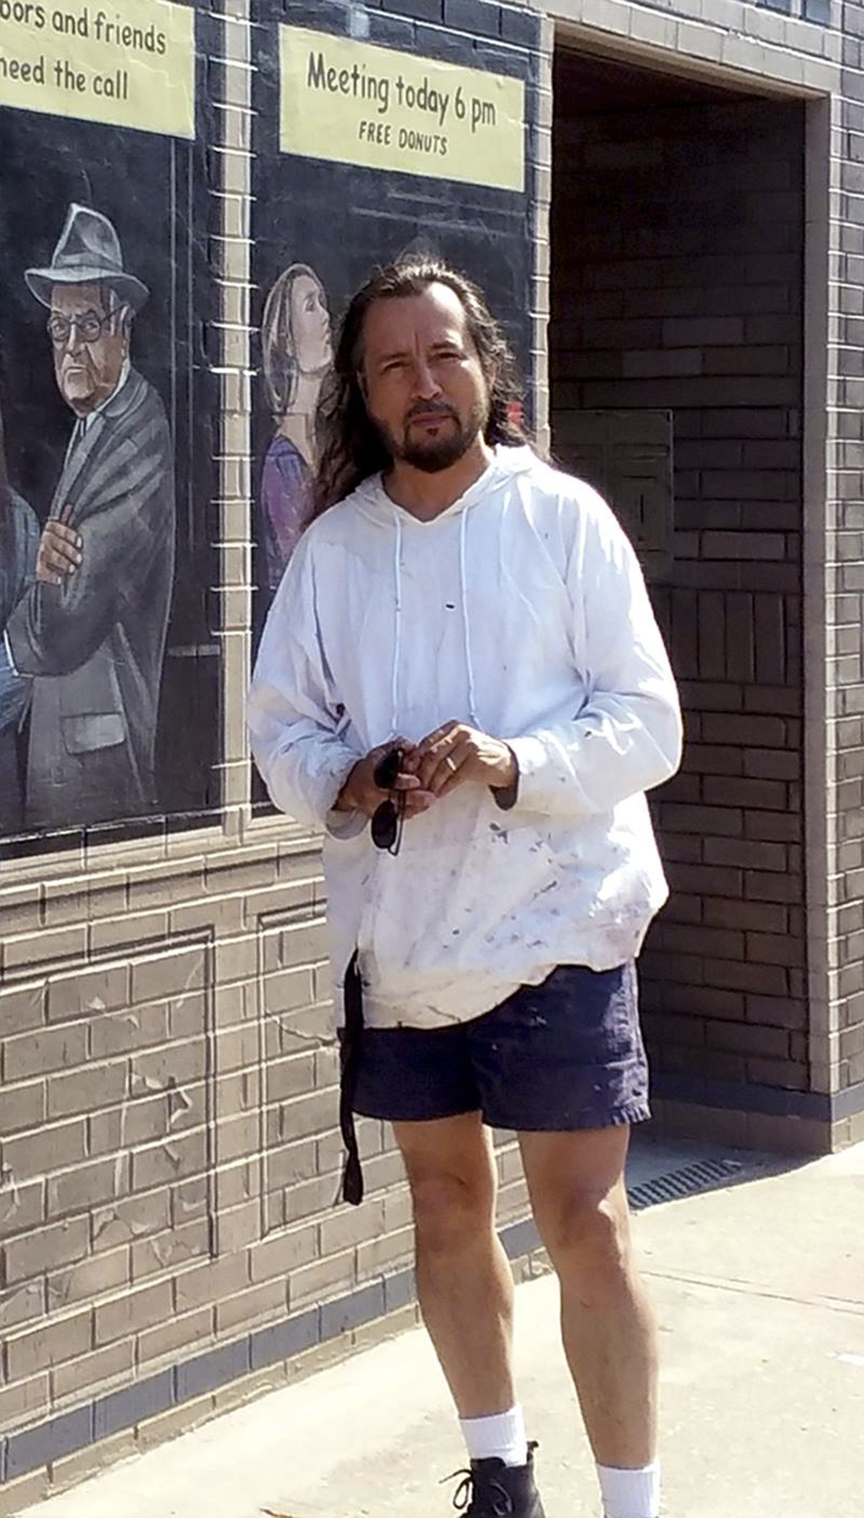
The restoration of the mural took the entire month of June 2018. I'm wearing the same hooded shirt I wore when I completed the mural three years before. But this time around, I was not wearing a back brace under the shirt or suffering from chronic pain. In the intervening three years, I survived cancer surgery, and also had disc replacement and spinal fusion surgery. I was in fact, pain free. |
 |
||
|
Mural |
 |
||
|
The final act of every mural project, is closing shop and driving away. For me this was a liberating moment. |
 |
||
|
|